Choosing the Right Sandpaper Grits for Car Painting: A Practical Guide
Automotive sanding isn’t about blindly following a grit chart. It’s about responding to what your surface shows you and choosing grits that match each stage of work. The scratches you create at one step must be easy to remove at the next, or you’ll waste time and risk ruining the finish.
Here’s a straightforward guide based on real sanding behavior and common pitfalls, with clear examples to help you make better decisions.
Why Starting Too Coarse (80 or 120 Grit) Often Creates More Problems Than It Solves
Many people jump straight to very coarse sandpaper expecting fast paint removal. But using 80 or 120 grit first usually leaves deep scratches that take much longer to fix later.
What happens: The coarse grit cuts aggressively, digging deep grooves into primer or metal. When you switch to finer grits, these grooves don’t disappear quickly. You end up spending more time sanding through multiple intermediate grits just to erase those scratches.
Better starting point: Use 400 to 600 grit for initial primer smoothing or paint removal. This range removes material without leaving deep gouges, so the next finer grits can polish those scratches away more easily.
Why Skipping Grits Costs Time and Quality
It might feel tempting to jump from 400 grit directly to 1500 grit, thinking you’re speeding things up. But this almost always backfires.
What you see: After sanding with 1500 grit, faint but deep scratches from the 400 grit remain visible under bright light and show through clear coats as haze or dull spots.
Why this happens: Finer grits like 1500 are designed to smooth out very small imperfections, not cut through deep scratch marks left by coarser paper. If you skip intermediate steps like 800 or 1000 grit, those deeper scratches stay under the surface.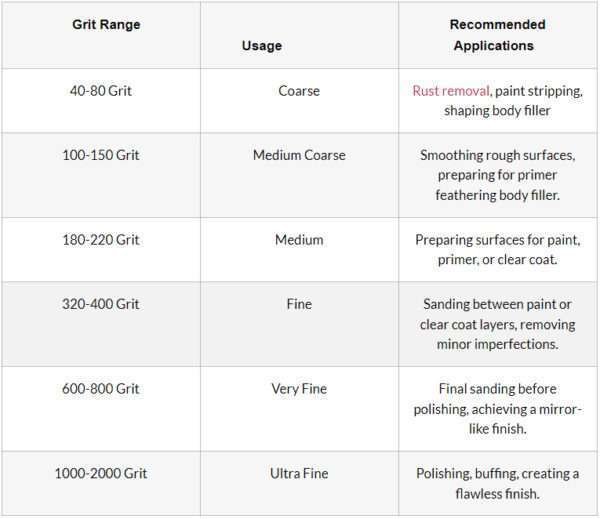
Tip: After each sanding step, inspect your work under strong daylight or a bright lamp. If any sharp scratch lines remain, add an intermediate grit before moving on.
Wet Sanding Above 800 Grit Protects Your Paint
Dry sanding feels natural because you see dust flying off, but it also generates heat that can damage delicate paint layers at fine grits (above 800).
What happens: Heat buildup changes the paint chemistry subtly, causing dull spots or micro-scratches invisible until after polishing.
How wet sanding helps: Water cools the surface and carries away debris, reducing friction significantly. It also slows your sanding naturally because wet sandpaper requires gentler pressure and smoother strokes.
Use wet sanding from about 800 grit onward as a “slow down” signal. It protects your finish while helping you notice subtle surface changes more clearly.
Not All “1500 Grit” Papers Are Equal, Choose Automotive-Grade Silicon Carbide
Different brands label their sandpapers “1500 grit,” but quality varies widely in abrasive type and durability.
- Silicon carbide papers for wet sanding last longer and create consistent scratch patterns.
- Cheap papers clog quickly or cut unevenly, confusing your visual assessment and pushing you toward excessive pressure.
- This leads to over-sanding or repeated attempts that waste time and risk damage.
For automotive work above 800 grit, invest in good-quality silicon carbide wet/dry papers made specifically for cars. That consistency helps your eyes trust what they see after each pass.
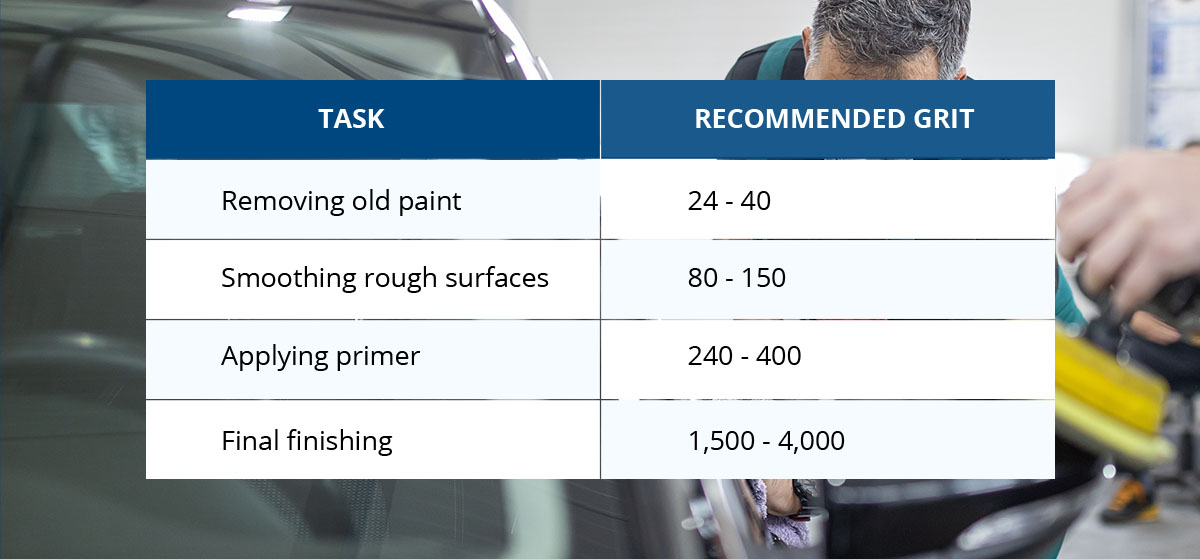
A Simple Grit Progression Chart for Common Auto Sanding Tasks
| Task | Recommended Grit Progression | Notes |
|---|---|---|
| Primer smoothing | 400 (dry) → 600 (dry) | Start here if primer is rough but no heavy rust or damage |
| Feathering edges between primer & paint | 600 (dry) → 800 (wet) → 1000 (wet) | Wet sanding starts at 800 for smoother blending |
| Final smoothing before basecoat | 1000 (wet) → 1500 (wet) → 2000 (wet) | Remove fine texture; prepare for clear coat |
| Paint removal (if necessary) | Start at 400; avoid coarser than needed | Coarser paper risks deep scratches |
Follow this progression without skipping steps. If scratches remain visible under bright light after any step, repeat that grit or add an intermediate one before moving forward.
Common Mistakes Diagnosed by What You See
- Scratches visible through clear coat: Usually caused by skipping intermediate grits or starting too coarse.
- Sandpaper clogging during fine sanding: Dry sanding above ~800 grit creates dusty buildup; switch immediately to wet sanding.
- Uneven surface texture after sanding: Often results from inconsistent hand pressure or angled paper contact; keep strokes light and flat.
An Illustrative Example: Fixing a Rust Spot Repair
- Primer has rough edges after application.
- Use 600 grit dry sandpaper first, this smooths edges without exposing metal.
- Inspect carefully: edges look softer but some scratches remain.
- Move to 800 grit wet sandpaper: feather edges between primer and existing paint.
- Surface feels smooth with no sharp transitions.
- Before applying basecoat, finish with 1500 grit wet sandpaper, removes tiny texture differences.
- Result is a frictionless finish after clear coat without visible defects.
Skipping the middle steps here leads to ridges showing through paint later, a common failure caused by ignoring what your eyes tell you at each stage.
How to Inspect Your Work Like a Pro
- Always check surfaces under strong daylight bulbs or direct sunlight.
- Look closely for sharp lines, reflective scratches, or uneven haze, not just feel with your fingers.
- Use water when wet sanding as a visual cue: if water runs clear quickly while sanding at high grits, debris is being removed effectively.
- Take photos at each stage; comparing them helps train your eye over time.
Key Takeaway: Let Patience Guide You Rather Than Speed
Sanding is not about rushing through numbers but about responding carefully to what the surface reveals after each pass. Each step is an experiment where your eyes gather clues on what needs correction next.
Pushing forward too fast because “it feels smooth enough” often locks in mistakes that only show up after painting. Slow down, observe closely under good light, then move forward confidently when all scratches are gone from the current grit level.
By following this practical approach based on observation rather than guesswork, and sticking close to this simple grit progression, you’ll save frustration and achieve professional-quality finishes more reliably every time.
